Below is a video of our Standard Salesforce Integration in action:
Here is how:
Step 1: Enable ContractSafe Salesforce integration through Settings - Security and Integration - and enable the Salesforce integration. Click the Generate Salesforce Endpoint URL and copy it for future use.
Enter your Salesforce Account user, Password, and Account Security Token.
IMPORTANT: If your password ever changes, you will need to reset your Account Security Token and re-enter both into ContractSafe.
NOTE: If you are working in a Salesforce Sandbox environment, make sure to check the Use Sandbox checkbox.
Step 2:
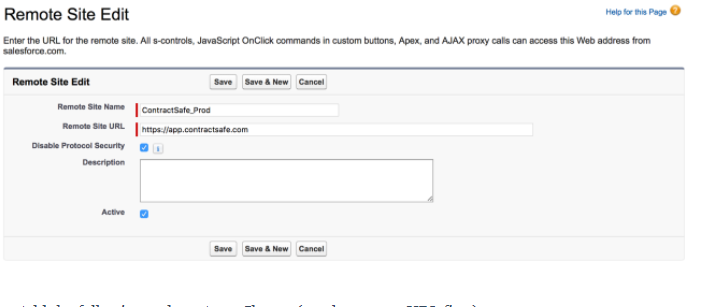
In your Salesforce account, add app.contractsafe.com as a new Remote Site.
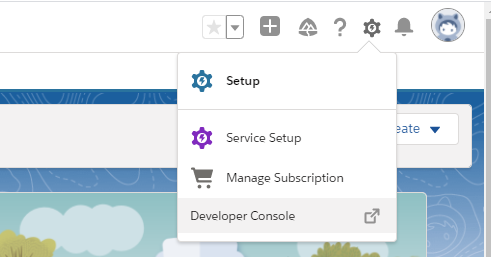
To get there, click the Settings gear in the top right, followed by Setup. In the Quick Find search bar, enter "Remote Site",
Step 3: Modify the Apex Class
Click File > Open > Classes > {the file for the old Apex class}. Alternatively, create a new Apex class and keep the old one if you would like. Call it "ContractSafeWsLightning"
- Insert the following code. Note that the bold part of the code will need to be your specific ContractSafe endpoint that we have generated and copied from the previous step:
global class ContractSafeWsLightning {
   @AuraEnabled
   webservice static String sendToCS(String contractId) {
       User u = [select email from user where id=:userinfo.getuserid()];
       String useremail = u.Email;
       HttpRequest req = new HttpRequest();
       HttpResponse res = new HttpResponse();
       Http http = new Http();
       req.setEndpoint('https://app.contractsafe.com/salesforce/721ad9fb07fa4b198a5ab2ddd8eb5645/sfc/');
       req.setMethod('POST');
       req.setBody('{"sfobjectID":"'+ contractId +'","user":"' + useremail + '"}');
       req.setHeader('Content-Type', 'application/json');
       req.setHeader('Accept', 'application/json');
       try {
           res = http.send(req);
           Integer statusCode = res.getStatusCode();
           if (statusCode == 200) {
               return 'Success! Your contract was sent successfully.';
           } else {
               String responseBody = res.getBody();
               Map<String, Object> jsonResponse = (Map<String, Object>) JSON.deserializeUntyped(responseBody);
               String errorMessage = (jsonResponse.containsKey('message')) ? (String) jsonResponse.get('message') : 'Unknown error';
               return 'Error: HTTP ' + statusCode + ' - ' + errorMessage;
           }
       } catch(System.CalloutException e) {
           System.debug('Callout error: '+ e);
           System.debug(res.toString());
           return 'Callout error: ' + e.getMessage();
       }
   }
}
Optionally: If you're working in a Salesforce Sandbox Environment, you will need to create Test classes with sufficient code coverage in order to finally deploy to Production.
Click File > New > Apex Class and enter the name ContractSafeWsLightningMock. Then paste in the following code.
@isTest
global class ContractSafeWsLightningMock implements HttpCalloutMock {
    global HTTPResponse respond(HTTPRequest request) {
        HttpResponse response = new HttpResponse();
        response.setHeader('Content-Type', 'application/json');
        response.setBody('{"response": "ContractSafe response"}');
        response.setStatusCode(200);
        return response;
    }
}
Click File > New > Apex Class and enter the name ContractSafeWsLightningTest then paste in the following code.
@isTest
public class ContractSafeWsLightningTest {
    static testMethod void runTest(){
        Test.setMock(HttpCalloutMock.class, new ContractSafeWsLightningMock());
        Test.startTest();
        ContractSafeWsLightning.sendToCS('1234');
    }
}
You can run the test by returning to the ContractSafeWsLightning Apex Class. Click Test > New Run and select your newly created ContractSafeWsLightningTest.
<aura:component controller="ContractSafeWsLightning" implements="force:appHostable,flexipage:availableForAllPageTypes,flexipage:availableForRecordHome,force:hasRecordId,forceCommunity:availableForAllPageTypes" access="global">
    <div class="slds-m-around--medium">
        <lightning:button variant="brand" label="Export To CS" onclick="{! c.sendContract }" />
    </div>
</aura:component>
({
    sendContract : function(component, event, helper) {
        helper.getResponse(component);
    },
})
({
    getResponse: function(component) {
        // create a server side action.
        var action = component.get("c.sendToCS");
        action.setParams({
            "contractId": component.get("v.recordId")
        });
        action.setCallback(this, function(response) {
            var state = response.getState();
            if (component.isValid() && state === "SUCCESS") {
                var result = response.getReturnValue();
                alert(result);
            } else {
                var errors = response.getError();
                if (errors && errors[0] && errors[0].message) {
                    alert("Error: " + errors[0].message);
                } else {
                    alert("An unknown error occurred. Please contact ContractSafe support.");
                }
            }
        });

        $A.enqueueAction(action);
    },
})
Step 5: Test
1. Now we're ready to test. Click File > New > Lighting Application and instantiate your component inside it, like so: We recommend you name your application "ExportToCsLightningApp"
<aura:application >
    <c:ExportToCsLightning/>
</aura:application>
2. On the right, click "Preview" and it should load up the component. If all is good, you should see a simple button. It won't do much if you click it since it's not on the contract page and has nothing to reference.
If Salesforce SSO is enabled on ContractSafe, you will not be able to send documents to ContractSafe from Salesforce.