Follow these directions to integrate ContractSafe with OneLogin
Initial Setup
- From the admin page, navigate to the Applications panel.
- In the top right corner, click Add App.

- Search for and select SAML Custom Connector (Advanced).
- Rename the application to your liking. We like to use “ContractSafe.”
- Click the Save button in the top right corner.
- Optionally, assign a logo to your application. We use this logo:
Configuration
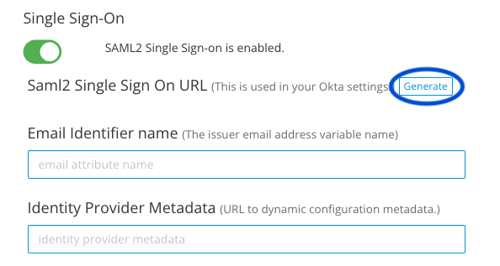
- Login to ContractSafe.
- Go to Settings > Security & Integrations and enable Single SignOn.
- Click Generate to obtain a Saml2 Single Sign On URL and copy it for use later.
- In the Email Identifier name field enter emailAddress.
- Back in Onelogin, navigate to Configuration from the panel on the left
hand side.- Paste the URL we copied above into Audience, Recipient, and ACS
(Consumer) URL. - In ACS (Consumer) URL Validator paste the same url but with a
backslash (\) character inserted before each forward slash, period,
and underscore. See example image below.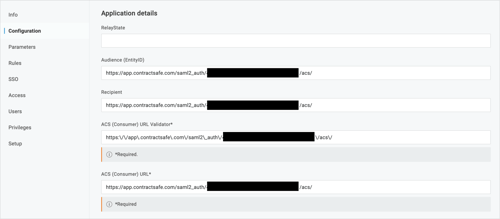
- Change the SAML issuer type to Generic.
- Change the SAML signature element to Both.
- Paste the URL we copied above into Audience, Recipient, and ACS
- From the panel on the left, navigate to Parameters.
- Click the blue plus symbol on the right to add a new parameter.

- In Field name type emailAddress and check the Include in SAML
assertion checkbox. Then click Save. - Select Email from the Value dropdown and click Save.
- Click the blue plus symbol on the right to add a new parameter.
- From the panel on the left, navigate to SSO.
- Under SAML Signature Algorithm select SHA-256.
- From the Users page, ensure that all users (or groups) allowed access to
ContractSafe are listed here. Email addresses must match between
Onelogin and ContractSafe. - Click More Actions > SAML Metadata to download a metadata file.
- Back in ContractSafe Settings > Security and Integrations, upload that
metadata file and click Save. - Finally, navigate to your OneLogin homepage to test your new login
button!
Please reach out to support@contractsafe.com for any questions.