Note: If your team already uses DocuSign, we've got you covered too. See our DocuSign integration article here.
The Finalize and Maximize plans already comes with UNLIMITED E-Sign built in. Save up on cost by trying ContractSafe's E-Sign, and transition away from the hassle of switching between platforms just to get a document signed and filled up.
Table of Contents
1. Overview & Plans
Powered by Dropbox Sign, ContractSafe's eSign is natively embedded into the platform. When a contract is fully executed, your records update automatically. No manual uploads. No chasing down signed copies.
Plan Requirement: eSign is available exclusively on the Finalize and Maximize plans. Not sure if it's included in your subscription? Reach out to your Customer Success Manager or contact us at support@contractsafe.com.
2. Enabling eSign in ContractSafe
Before anyone on your team can send contracts for signature, an Admin needs to turn on the eSign feature.
Steps:
- Go to Settings > AI and Workflow Options
- Locate the eSign toggle and turn it on
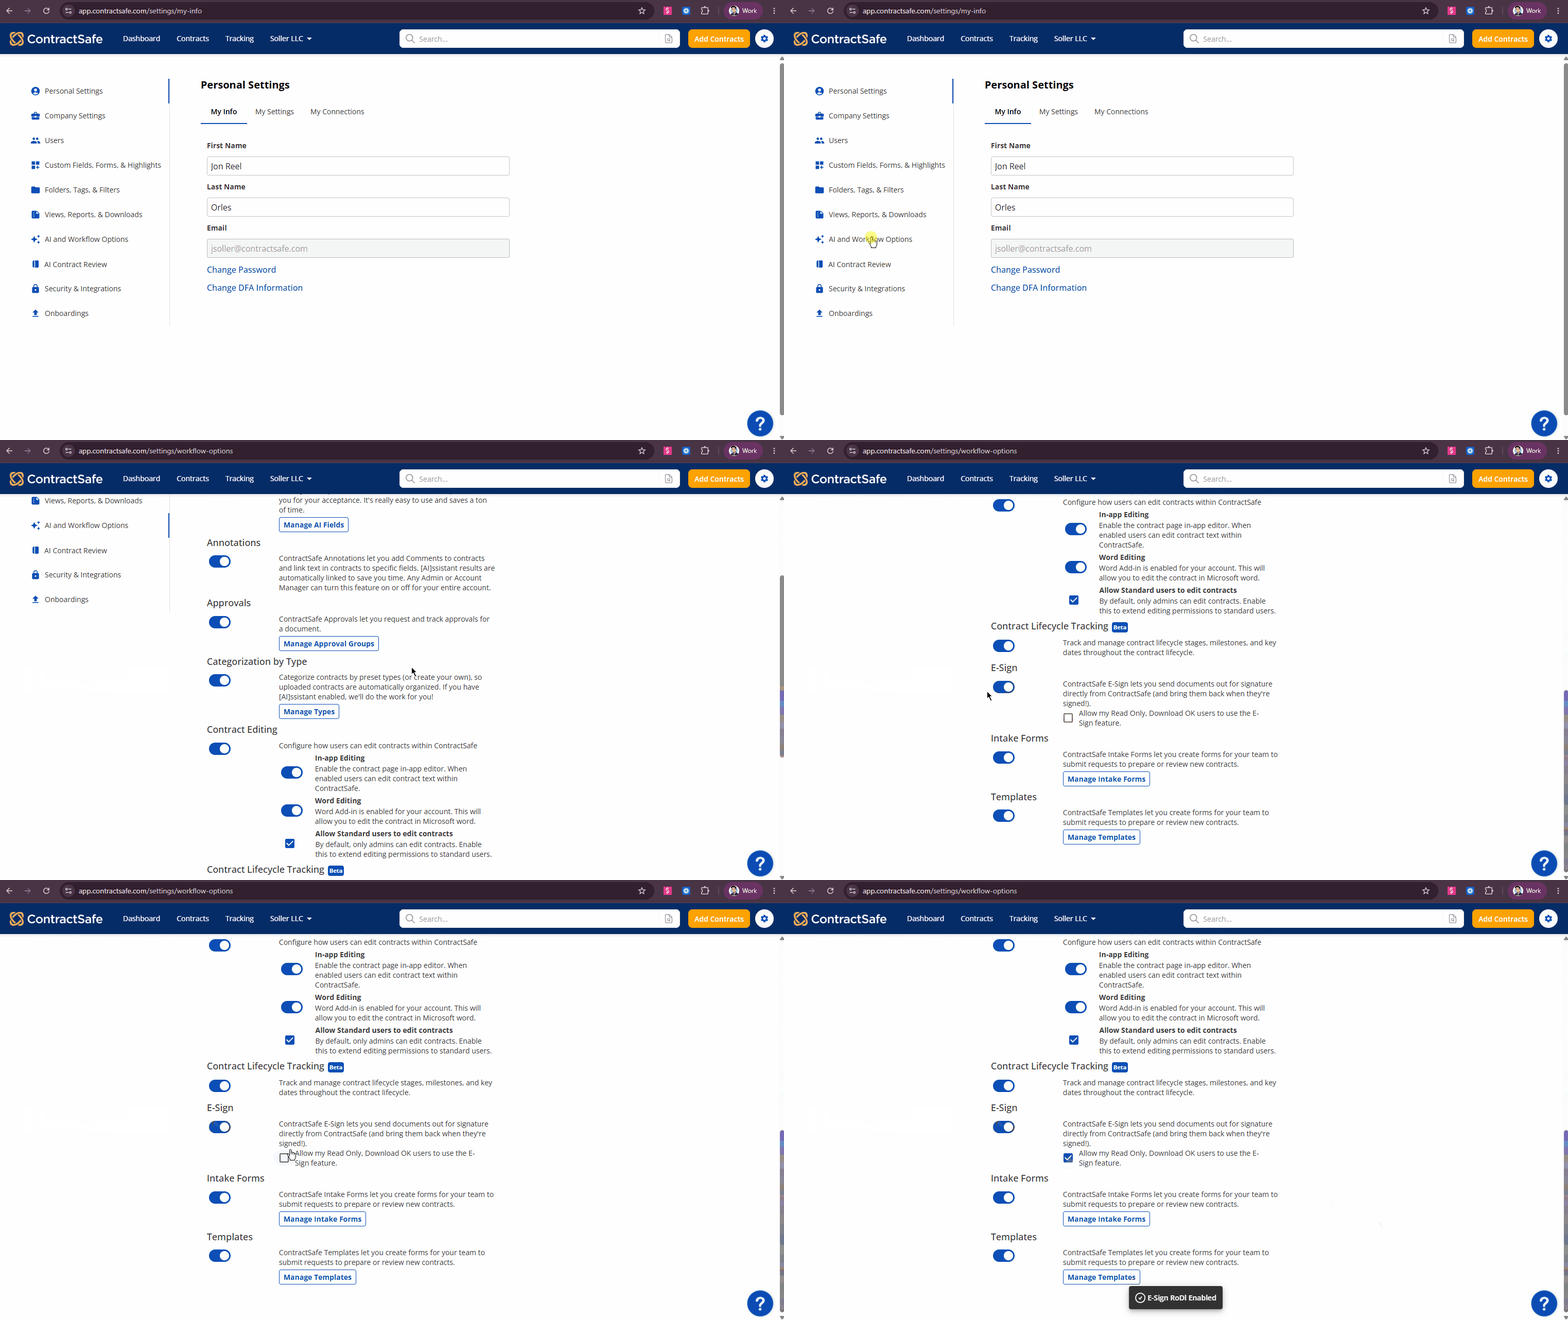
Tip: On the same E-Sign settings page, Admins can also grant Read Only, Download OK users the ability to use eSign if needed. This is useful for teams where certain members need to send for signature but don't require full edit access.
3. Sending a Contract for Signature
Step 1: Navigate to the eSign Workspace
- Open the contract you'd like to send for signature
- In the left-hand navigation panel, click on the eSign workspace icon
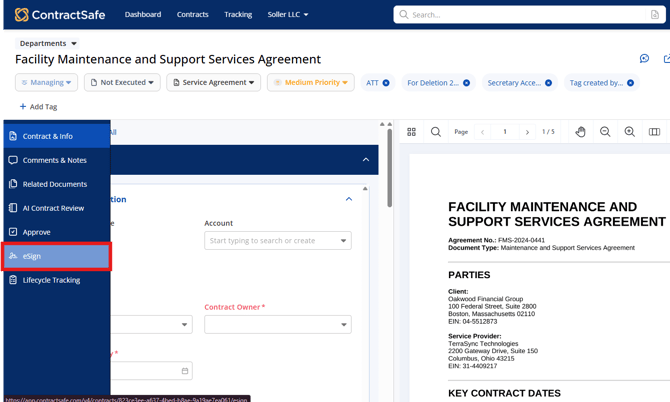
Tip: Each workspace has a unique URL, so you can send a teammate a direct link to the eSign tab of a specific contract. No more "can you find this contract and go to the eSign section for me?"
Step 2: Add Your Signers: Type the signer's name and email address, or select from a list of previously used signers.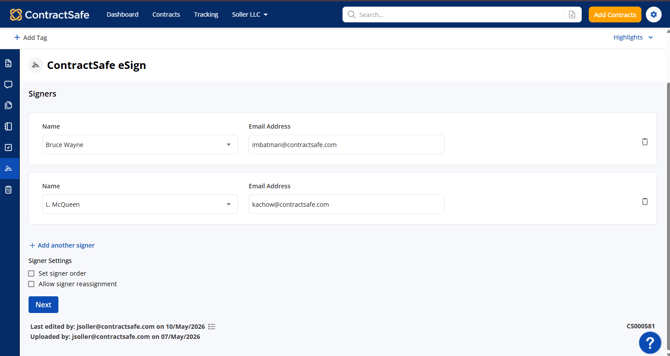
Signer Order: Check "Set signer order" if signers need to sign sequentially — for example, if your internal approver needs to sign before the counterparty does. If left unchecked, all signers receive the request simultaneously.
Allow Signer Reassignment: Toggle on "Allow signer reassignment" to give yourself the flexibility to swap out a signer after the request has been sent — without canceling the entire signing process. This is a huge time-saver when someone is out of office or a contact changes mid-process.
Real-World Example: You send an NDA to a contact at a partner company. Two days later, you find out that person left the company. Because you enabled signer reassignment, you can simply swap in the new contact. No need to cancel and restart the entire signing process.
When you're ready, click Next.
Note: Signers do NOT need a ContractSafe account to sign. They'll receive an email with a secure link to complete the signing process.
Step 3: Add Signature Fields: Drag and drop the relevant fields onto the contract document — signature, date signed, name, title, initials, and more. Each signer is represented by a different color so you can clearly see what's assigned to whom. Once fields are placed, click Next.
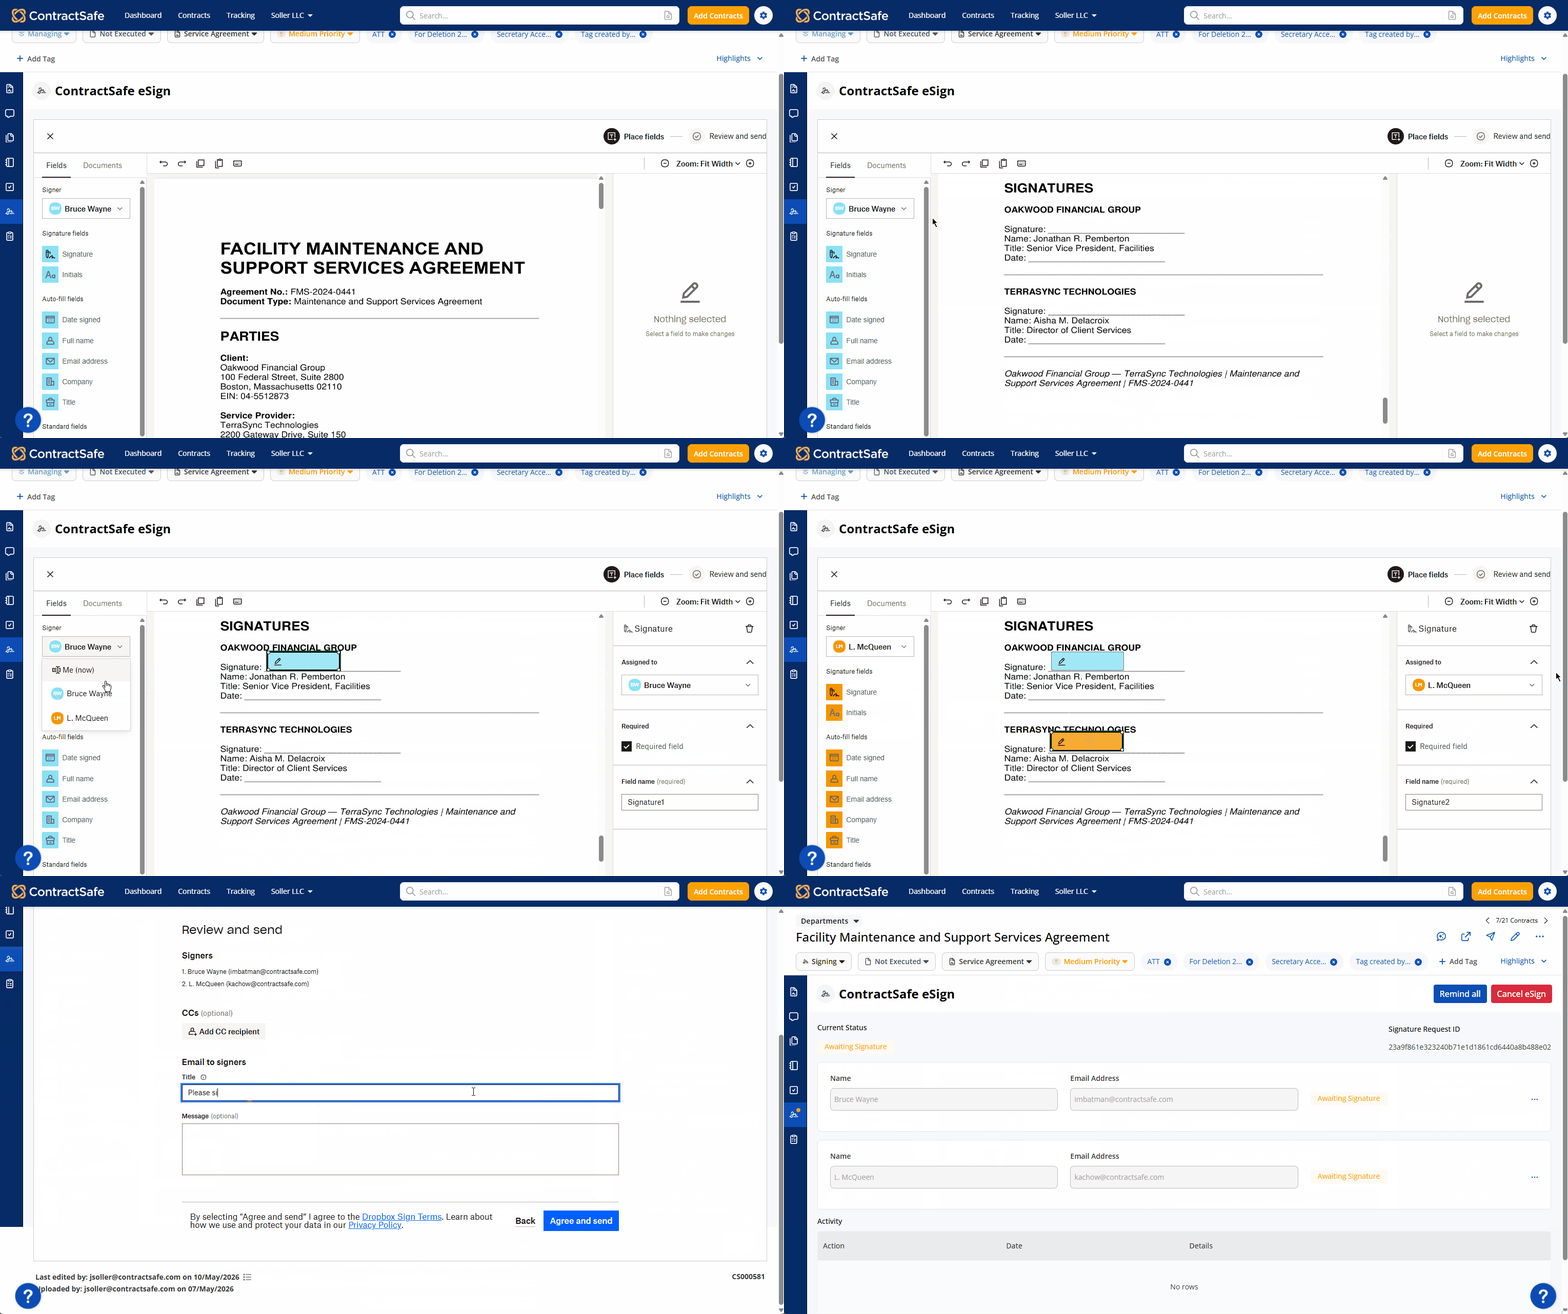
Step 4: Add a Title, Message & Send: Add a title and an optional custom message for your signers. This message will appear in the signature request email they receive.
Click Agree and Send - your signers will receive an email notification with a link to sign.
Tip: A clear, personalized message goes a long way. Try: "Hi [Name], please review and sign the attached vendor agreement at your earliest convenience. Let me know if you have any questions!"
This avoids your request from being misidentified as spam or email clutter.
You cannot set a default email subject and message.
4. Adding Signature Fields
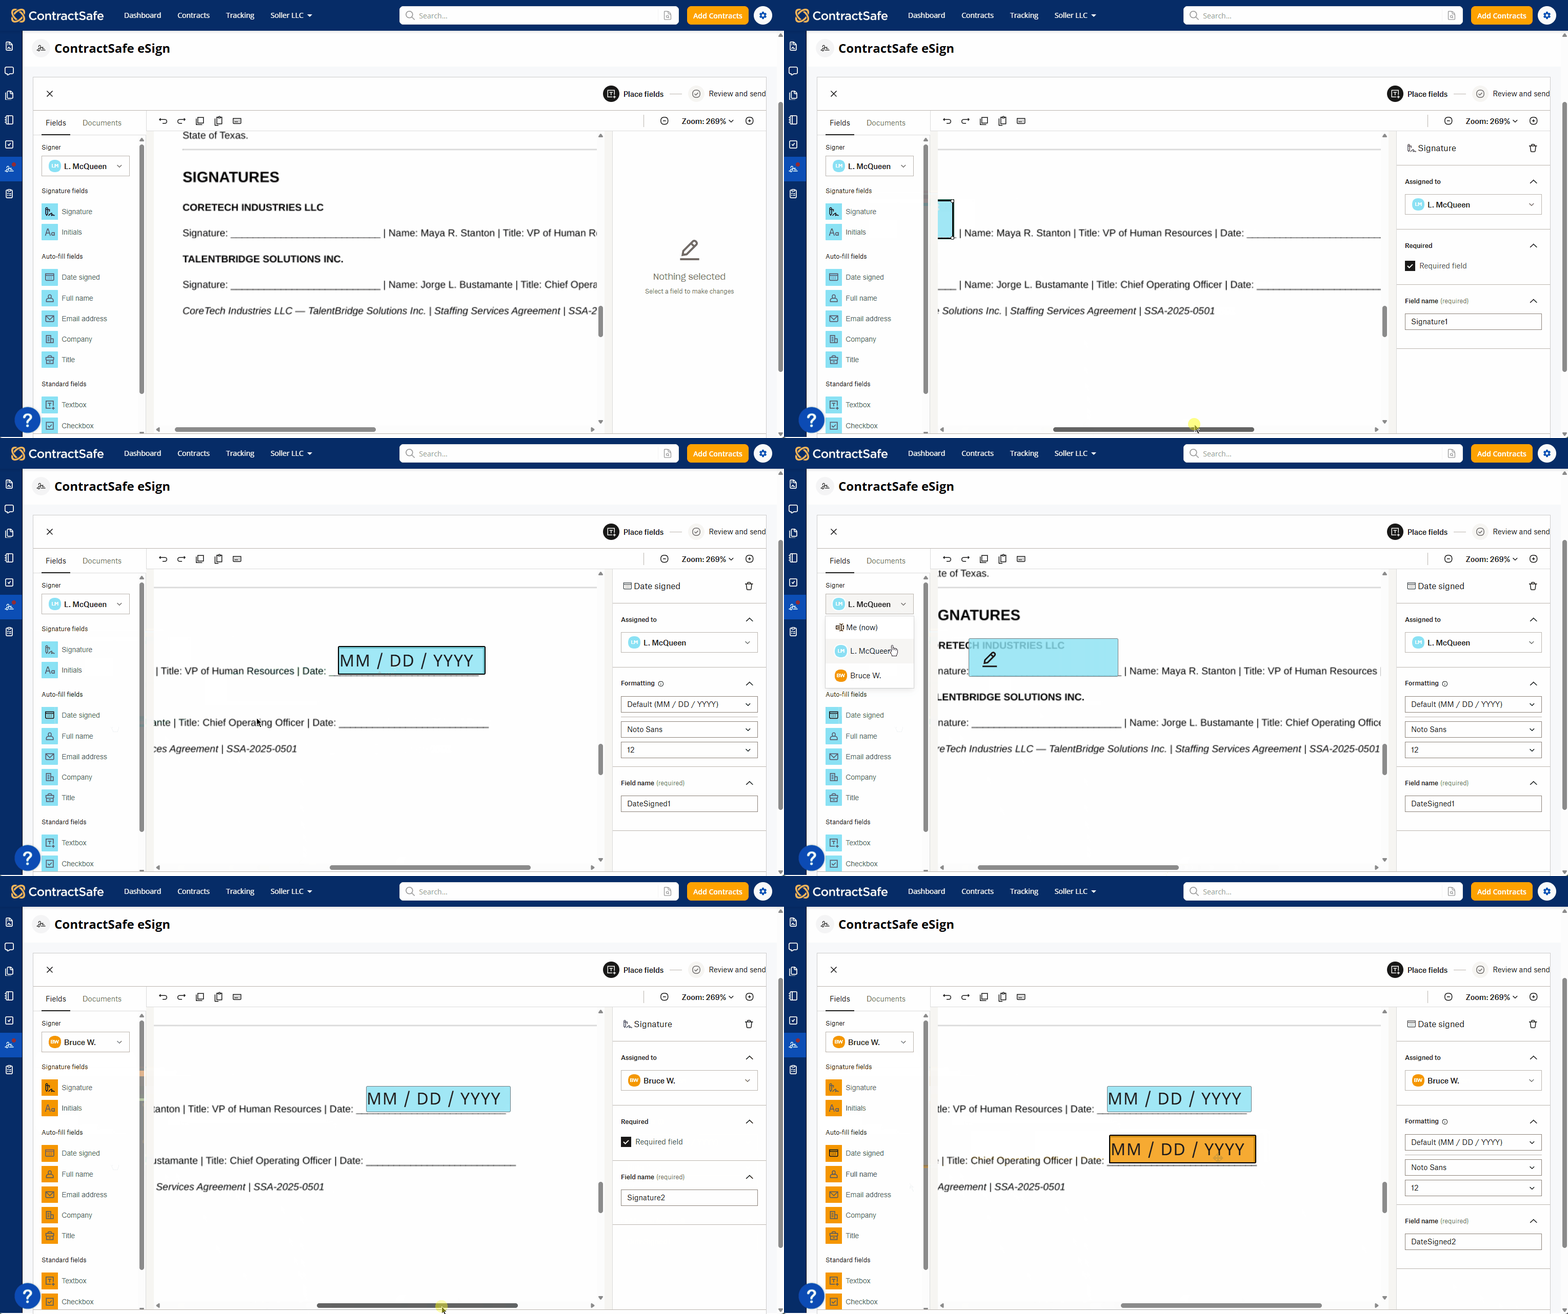
When placing signature fields on a document, you can include any combination of the following:
- Signature — The actual e-signature field
- Initials — For multi-page documents requiring initials on each page
- Full Name — Auto-populated for the signer
- Title — Signer's job title
- Date Signed — Auto-populated with the date the signer completes the process
- Email Address — Signer's email address
Each signer is assigned a unique color, making it easy to see at a glance which fields belong to which party.
Tip: For multi-page contracts, scroll through the entire document and place fields on each relevant page before hitting Send. This prevents signers from missing signature spots.
5. Tracking eSign Progress
Once you send a signature request, ContractSafe makes it easy to monitor where things stand.
After sending, the eSign workspace displays the current status as Awaiting Signature, along with a list of each signer and their individual status.
| Status | What It Means |
|---|---|
| Awaiting Signature | The request has been sent and is waiting on one or more signers |
| Partially Signed | At least one signer has completed their signature, but others haven't yet |
| Signed | All parties have signed; the contract is fully executed |
| Canceled | The signature request was canceled |
6. Managing Signers After Sending
A. Reminding Signers to Sign
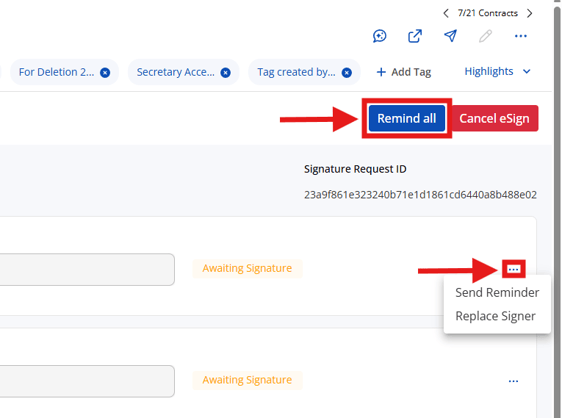
- Remind All: Click this button to send a reminder email to all signers who haven't yet signed. Signers who have already signed will not receive a reminder.
- Send Reminder (Individual): Click the ellipsis (...) next to a specific signer and select Send Reminder to nudge just that person.
Tip: ContractSafe automatically sends reminder emails to signers at 3 days and 7 days after the initial request — and then every 7 days after that — so you're covered even if you forget to follow up manually.
B. Replacing a Signer: Need to swap out a signer after the request has already been sent? (if "Allow signer reassignment" was enabled when sending):
- Go to the eSign workspace
- Click the ellipsis (...) next to the signer you want to replace
- Select Replace Signer
- Enter the new signer's name and email
- The new signer will immediately receive an email requesting their signature
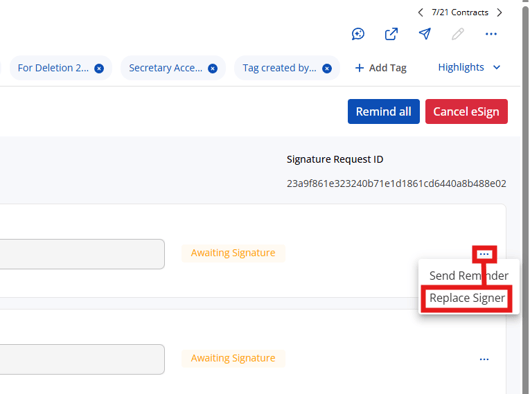
Real-World Example: Your counterparty's legal contact is on parental leave. Their colleague is stepping in. Rather than canceling the entire request and starting over, you replace the original signer with the new contact - keeping the process moving smoothly.
C. Canceling a Signature Request: Click Cancel eSign in the eSign workspace. All signers will receive an email notification that the request has been canceled.
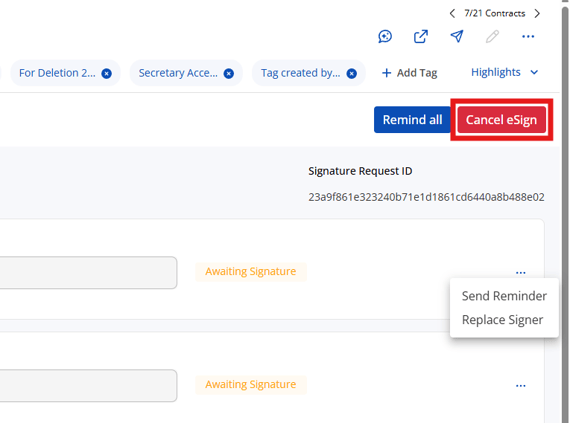
Note: Canceling a request is permanent. You'll need to send a new request if you want to restart the signing process.
When you cancel a request, any person who has already signed will be kept. A clean (unsigned) copy of the document is available on the attachments section.
D. Adding an Additional Signer: Need to add someone who wasn't included in the original request?
- Open the contract and go to the eSign workspace
- Click Cancel eSign to cancel the current request
- Create a new signing request and include the additional signer
Good news: Any signers who already completed their signature do not need to sign again. When you restart the request, simply skip those who've already signed and only include those who still need to.
Tip: Still waiting on your signer to respond? ContractSafe automatically sends reminders after 3 and 7 days, so you don't have to follow up manually right away.
7. Signing Directly in ContractSafe
One of the most powerful additions to eSign is the ability to sign pending requests without ever leaving ContractSafe. This option is available if the signer is also added as a user on ContractSafe.
Instead of searching through your email inbox for a signature request, you can complete the signing process directly from the contract record.
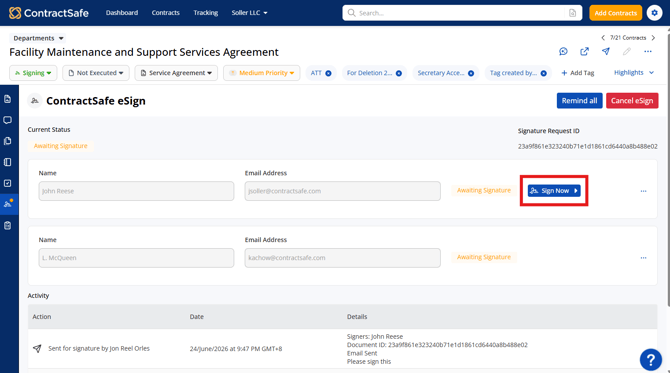
How it works:
- Open a contract with a pending signature request
- Click the Sign Now button that appears in the eSign workspace
- Complete the signing process inline. No email hunting required
Tip: Combine this with Pending eSign Filters (see Section 10) to build a quick daily habit: filter for all contracts awaiting your signature, then knock them out one by one. All without leaving ContractSafe.
Real-World Example: It's Monday morning. You have three contracts waiting for your signature. Instead of digging through email threads, you open ContractSafe, filter for "Awaiting Signature From: Me," and work through each one in minutes. All in one place.
8. Filtering & Reporting on eSign Activity
Stay on top of your signing pipeline with ContractSafe's built-in eSign filters, accessible from the contract list view.
| Filter | What It Does |
|---|---|
| eSign Status | Filter contracts by current signing status: Awaiting Signature, Canceled, Partially Signed, or Signed |
| eSign Requested Date | Filter by when the signature request was sent (Last Month, This Month, Last Year, Custom range) |
| eSign Completed Date | Filter by when the contract was fully signed |
| eSign Requested By | Filter by the name/email of the person who initiated the request |
| Signed By | Filter by name/email of someone who has already completed their signature (excludes pending signers) |
| Awaiting Signature From | Filter by name/email of someone who hasn't signed yet |
Real-World Example: Your legal ops team wants to pull a report of all contracts sent for signature in Q2 that are still pending. Use the eSign Requested Date filter with a custom range for April–June, then add eSign Status: Awaiting Signature = instant visibility into your signing backlogs
Tip: Save your most-used filter combinations as a Saved View so you can pull up your eSign pipeline dashboard in one click anytime.
9. What Happens When a Contract is Fully Signed
Once all parties have completed their e-signatures, ContractSafe handles the rest automatically:
- The signed version of the contract replaces the draft on the contract record
- The original unsigned document is saved as an attachment (Related Document) for your records
- The contract is automatically marked as Fully Executed
- A full audit trail of the signing process is attached to the final document - including who signed, when, and from where
Tip: The audit trail is especially valuable for compliance and legal verification. It's accessible directly from the contract page and includes a complete log of every signing action.
Real-World Example: Your team executes a services agreement with a new vendor. The moment the last signature is collected, ContractSafe updates the contract record, stores the unsigned version as a reference attachment, marks the contract "Fully Executed," and logs a complete audit trail - all automatically. No one has to lift a finger.
10. Using DocuSign or Other E-Sign Providers
Already have a DocuSign account? No problem. ContractSafe integrates directly with DocuSign in both one-way and two-way configurations. ContractSafe can also connect with other e-sign platforms through our Zapier integration.
Why juggle multiple platforms and pay for extra subscriptions when everything you need is already right at your fingertips?
By switching to ContractSafe’s built-in e-signing feature, you can completely streamline your contract lifecycle. From signature execution to secure storage directly within the platform you already know and trust. Say goodbye to the hassle of managing separate DocuSign integrations, reduce your unnecessary software costs, and keep your team's workflow perfectly unified without ever having to bounce between different apps.
Make the switch today to keep all your sending, signing, and tracking in one centralized workspace, and experience how effortless all-in-one contract management can truly be!
Below are links to our complete DocuSign documentation:
| Article | Description |
|---|---|
| Integrating with DocuSign | Full overview of the DocuSign integration, including one-way and two-way setup |
| DocuSign — Standard One-Way Setup | Step-by-step guide for automatically pushing fully executed DocuSign contracts into ContractSafe |
| DocuSign — Two-Way Integration | Send documents from ContractSafe to DocuSign for signing, and have them return automatically once executed |
| Assign a Folder & Capture Data via DocuSign | Use DocuSign Envelope Custom Fields to control where contracts land in ContractSafe and populate key fields |
| Limit Which DocuSign Documents Flow into ContractSafe | Control which DocuSign users or envelopes sync into ContractSafe |
| Remove Your DocuSign Integration | Steps to delete an existing DocuSign integration from ContractSafe |
| Migrating from Legacy DocuSign Authentication to JWT Grant | Required migration guide for organizations using the retired username/password DocuSign authentication method |
FAQs
Where will e-sign emails be coming from? esign@contractsafe.com
Do people have to be added to ContractSafe before they can sign? No, signers do not have to be ContractSafe users in order to sign. The only requirement is a name and an email address. Signing can be done within the email's built in web browser (after clicking the sign now button)
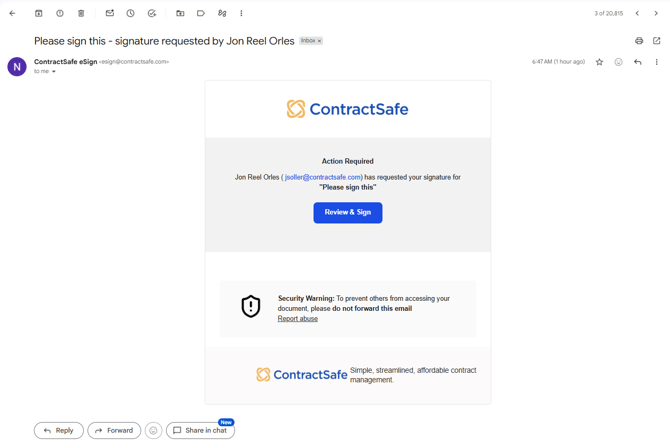
What does the emailed e-sign request look like?