
The Docusign two-way integration lets you start with agreements in ContractSafe and send them to Docusign for e-signature. To set it up, you create a Docusign integration app with an RSA key pair (JWT Grant), add a service user and grant consent, then enter those credentials under Settings → Security & Integrations → DocuSign Settings in ContractSafe.
This integration is featured on specific subscriptions. If you're unsure if this integration is part of your subscription, please contact your customer success manager or support@contractsafe.com.
How the two-way integration works
We call this Docusign Two-Way Integration because it lets you start with agreements in ContractSafe and send them to Docusign for e-signature.
You can store draft documents in ContractSafe and then send them out to Docusign for signature. Just set up your signing process as you normally would in Docusign. Once a document is fully executed, it returns to ContractSafe and replaces the draft document. The draft is stored in Related Documents for record-keeping. The contract is then also marked Fully Executed.
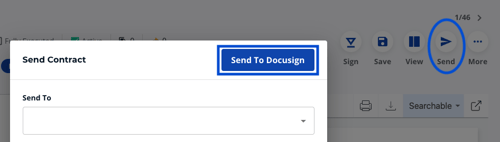
After completing the steps below, you'll find the Send to DocuSign button in ContractSafe when you select Send on any contract.
Set a default account to receive contracts from all users
Step 1: Create a Docusign integration app
- Log in to the Docusign eSignature admin portal.
- In the left sidebar, go to Integrations → Apps and Keys.
- Click Add App and Integration Key.
- Give the app a name (e.g., ContractSafe Integration) and click Create App.
- Note the Integration Key (Client ID). You'll need this later.
Step 2: Generate an RSA key pair
Still on the app detail page:
- Scroll to the Authentication section.
- Under Service Integration (JWT Grant), click Generate RSA.
- Docusign will display a private key and a public key. This is the only time the private key is shown.
- Copy or download the private key immediately and store it securely. It will look like:
-----BEGIN RSA PRIVATE KEY-----
MIIEowIBAAKCAQEA...
-----END RSA PRIVATE KEY-----
The public key is saved automatically in Docusign. You don't need to store it separately.
Step 3: Create a service user
This is the Docusign account ContractSafe will impersonate. All envelopes sent through the integration will appear in this user's drafts folder. If you already have an existing account you'd like to use, skip points 1-3 and continue at 4.
- In the Docusign admin portal, go to Users.
- Click Add User and create a dedicated service account:
- Name: Something descriptive, e.g., ContractSafe Integration
- Email: A real, accessible email address (e.g., docusign-integration@yourcompany.com). Docusign will send a verification email
- Permission Profile: Assign at minimum the DocuSign Sender permission profile
- Complete email verification for the new user account.
- Note the service user's API Username (User ID / GUID):
- Go to Users, find the service account, and click on it
- Copy the user UUID
Step 4: Grant consent for the integration
The service user must explicitly grant your integration permission to impersonate it.
Option A: Admin consent (requires Org Admin / Access Management feature)
If your Docusign account has the Access Management feature and has claimed your email domain:
- In the admin portal, go to Settings → Connected Apps.
- Find your app and grant admin consent for the signature and impersonation scopes on behalf of your domain users.
- No individual user action is required.
Option B: Individual consent URL
If Org Admin isn't available, construct a consent URL and have the service account user visit it while logged in to Docusign:
https://account.docusign.com/oauth/auth
 ?response_type=code
 &scope=signature%20impersonation
 &client_id=YOUR_INTEGRATION_KEY
 &redirect_uri=https://www.docusign.com
Replace YOUR_INTEGRATION_KEY with the Integration Key from Step 1. The user clicks Allow Access and consent is recorded.
To verify consent was granted, log in as the service account user, go to Manage Profile → Connected Apps, and confirm your app appears there.
Step 5: Configure ContractSafe
Once you have the credentials from the steps above, update the organization's Docusign settings in ContractSafe.
- Log in to ContractSafe.
- Navigate to Settings → Security & Integrations → DocuSign Settings.
- Update the following fields:
| Field | Value |
| Integration Key | Your Integration Key (Client ID) from Step 1 |
| Service Account User UUID | The service account's API Username (GUID) from Step 3 |
| RSA Private Key | The RSA private key from Step 2 (full PEM block). This will never be viewable in ContractSafe |
| Docusign HMAC Key & DocuSign Connect URL | Leave unchanged or, if setting up for the first time, see our One-Way DocuSign Integration guide |
Note: The RSA private key is stored encrypted. It will never be viewable in ContractSafe and we will never ask you for it.
Set a different account to receive contracts from any user
Individual users can opt out of the org-level JWT integration and route their sends through their own Docusign account instead. When the override is enabled, the user will be prompted to log into Docusign when sending documents, and their envelopes will land in their personal Drafts folder rather than the organization's service account.
This is configured per user in Personal Settings → Connections → DocuSign Settings.
What's the difference between one-way and two-way integration with Docusign?
ContractSafe offers two layers to integration with Docusign.
Sometimes in large organizations, certain teams (we're looking at you, Sales!) aren't always great at sending in their signed contracts. The One-way Docusign integration connects your Docusign account to ContractSafe, and then any time a contract reaches the fully executed stage with Docusign, the contract is pushed automatically into ContractSafe as a new contract. It's an easy way to keep every signed contract in ContractSafe, where the whole team tracks it!
The two-way Docusign integration, covered in this article, is for our customers who prepare drafts in ContractSafe and prefer to sign in Docusign. It connects your Docusign account to ContractSafe, and you're able to send a final draft from ContractSafe to Docusign for signing. "Push" it to Docusign, then set up the signing process as usual in Docusign. Once it's fully executed, it will come back to ContractSafe and update the existing contract record. ContractSafe will automatically replace the draft with the executed version (and save the draft for record-keeping), and mark the contract as fully executed.
Already using the older two-way setup? See migrating from legacy Docusign authentication to JWT Grant. For every Docusign option in one place, see integrating with Docusign, and for ContractSafe's built-in signing, see e-signatures in ContractSafe.
If you're experiencing any issues, your CSM can help guide you through the troubleshooting process. Please reach out to your CSM or our support team for help at support@contractsafe.com.